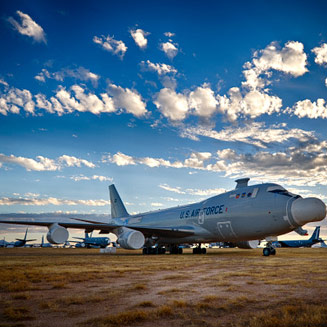
Creating 1 image from 7: A Photography How-To

 Because the Boeing 747 that housed the airborne laser (ABL) had a beautiful sunset to back it up, a special technique was used to retain fine detail throughout the shot. The difference in light levels between the clouds and shaded aircraft is too great for a camera to capture, or a computer screen to show, but there is a solution.
I mounted the camera on a stable tripod and captured seven images of the aircraft without moving. The seven images differed only in the length of time that light was allowed onto the camera sensor.
One image was as the camera’s metering system tried to produce a “normal” photo. However, because those light levels were so disparate, only a poor compromise was possible. Some parts of the image might have been alright, but the brightest and darkest areas were unusable. The brightest parts were pure white, without detail or color, and the darkest areas were pure black.
One of the seven images would have let in much, much more light. The result? The bright areas were even more white and featureless, the entire sky and much of the airplane was were almost completely blank. But the darkest areas would show actual detail and color. Another image would let in a bit less light than that, so the darkest areas were a bit darker, but the lightest areas were starting to reappear. And a third image let in a bit less light, but still a bit more than the “normal” photo.
Conversely, one image let in much, much less light, so that the dark areas were larger, with more of the image plunged into blackness. However, the clouds and sky had rich color and plenty of detail. Another image let in a bit more light, and the last image let in a bit more. The filmstrip illustrates the seven images in the order I’ve described.
The result was seven exposures that, in one or another, have color and detail in every part of the scene. But how do you make one from seven?
For this photo, I prepared the original camera files using DxO Optics Pro to “process” the files, allowing me to work with images that have consistent noise reduction, sharpening, and color correction. Then I combined the seven processed images using a Photoshop plug-in called HDR Efex Pro 2 from Nik Software and made adjustments to brightness, colors and other parameters to arrive at the final photo.
The point of all that was to compress the range of light levels in a way that appears natural and attractive. I know I succeeded because the Business Affairs Office was thrilled with it, and the image was also chosen to run in the base newspaper.
This technique worked for me — you may want to change things up. My exposures differed by a single f-stop. I could have made the differences greater or smaller. I could have processed the camera files differently, using different software and techniques. Other software can be used for combining the seven images. And for that matter, more or fewer images could be captured to create the final.
What was important was the vision to see an opportunity and doing the work to make it a reality.

